
Cosmetic dental photography is defined as the standardized practice of capturing high-resolution clinical images to document, diagnose, and support cosmetic dental treatment at every stage of care. In clinical dentistry, it functions as a shared visual language between dentist, patient, and dental laboratory. The American Academy of Cosmetic Dentistry recommends a series of 12 standardized photos that includes full-face portraits, retracted intraoral views, and occlusal shots. These images are not decorative. They are clinical records that make treatment planning more precise, lab communication more accurate, and patient education more effective. Whether you are a dental student building your first protocol or an experienced clinician refining your workflow, understanding this discipline changes how you practice.
What is cosmetic dental photography and why does it matter?
Cosmetic dental photography is the systematic capture of clinical images using standardized equipment, angles, and lighting to support every phase of cosmetic treatment. The term “dental photography” is the recognized industry standard, while “cosmetic dental photography” refers specifically to its application in esthetic and restorative cases. Both terms describe the same core discipline.
The importance of dental photography extends well beyond documentation. A clear photograph captures tooth shade, surface texture, gingival contour, and occlusal relationships in ways that written notes cannot. This visual record supports diagnosis, guides treatment planning, and gives the dental laboratory the precise references needed to fabricate restorations that match the patient’s natural dentition.
Photography also creates a timeline. Images taken at the initial consultation, during treatment, and at the final appointment allow you to evaluate outcomes objectively. Many patients are surprised to learn that a side-by-side comparison of before-and-after photos often reveals improvements they had stopped noticing because the change happened gradually.
What equipment and techniques produce consistent clinical images?
Reliable dental photography starts with the right equipment and a fixed protocol. Improvising camera settings from session to session produces images that cannot be compared meaningfully across time.

Recommended camera and lens setup
The preferred camera body is a DSLR or mirrorless system. A 100mm or 105mm macro lens provides the working distance and magnification ratio needed for intraoral shots without distortion. These focal lengths keep the camera far enough from the patient’s face to avoid discomfort while still filling the frame with the teeth.
Manual settings that ensure reproducibility
Manual mode is non-negotiable for clinical photography. The recommended settings are:
- ISO: 100–200 to minimize digital noise and preserve color accuracy
- Aperture: f/16–f/22 for maximum depth of field across the full dental arch
- Shutter speed: Synced to the flash, typically 1/125 or 1/200 of a second
- Flash: Ring flash or dual-point flash to eliminate shadows and render tooth color accurately
Proper lighting with ring or dual-point flash reduces laboratory remakes by giving technicians a shadow-free, color-accurate reference. That single improvement can save hours of chair time on remakes and adjustments.
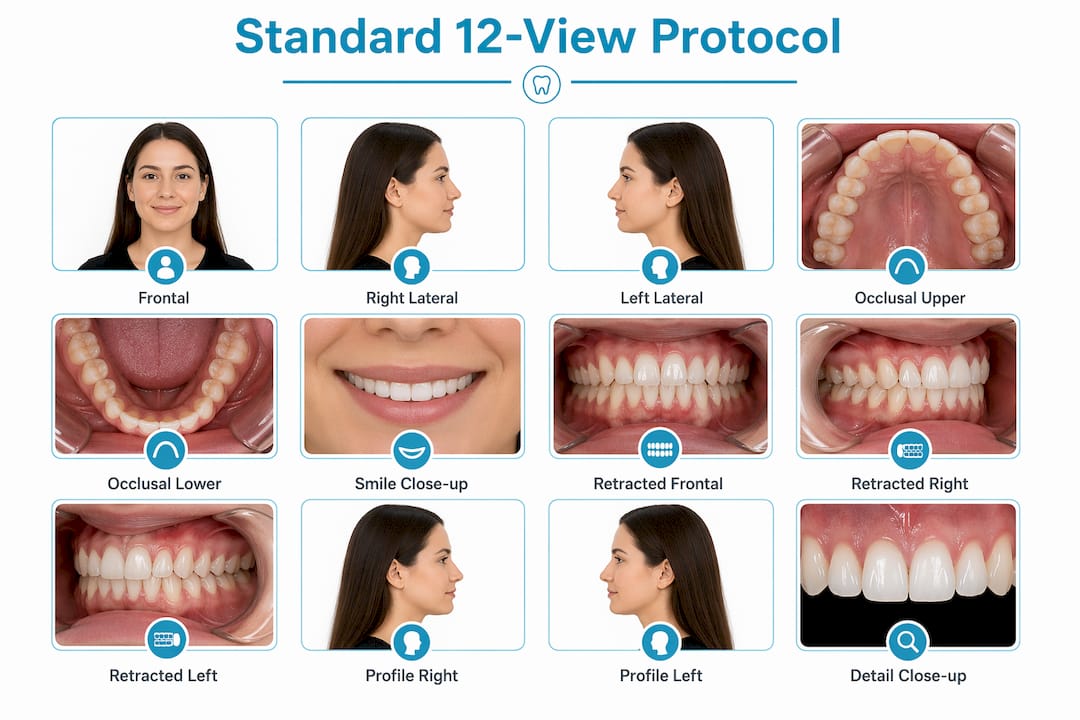
The 12-view standard protocol
The American Academy of Cosmetic Dentistry’s recommended series covers:
- Full-face frontal smile
- Full-face retracted frontal
- Full-face lateral smile (left and right)
- Retracted lateral views (left and right)
- Occlusal upper arch
- Occlusal lower arch
- Close-up retracted frontal
- Close-up lateral views
- Profile portrait (left and right)
Each view serves a specific diagnostic or communicative purpose. Skipping views leaves gaps in the clinical record that are difficult to fill later.
Pro Tip: Set your camera to the same magnification ratio for every session and mark the position on your lens barrel with a small piece of tape. Reproducibility across appointments depends on consistency, not guesswork.
How does dental photography improve communication and outcomes?
Dental photography as a diagnostic language rather than an artistic pursuit is the mindset shift that separates clinicians who use it well from those who do not. The clinical benefits are concrete and well-documented.
Communicating with the dental laboratory
A photograph communicates shade, translucency, surface texture, and gingival margin position far more precisely than a shade tab and written notes. When a technician fabricating a porcelain veneer can see the adjacent teeth in a standardized, shadow-free image, the restoration is more likely to match on the first try.
“Clear clinical photography reduces laboratory remakes and enhances the predictability of cosmetic restorations by providing accurate image references.” — Oral Health Group
This matters practically. Fewer remakes mean fewer additional appointments, lower lab costs, and a better patient experience. The photograph is not an extra step. It is the step that makes every other step more efficient.
Supporting patient education and trust
Photographs give patients something concrete to look at during the consultation. Showing a patient their own retracted frontal image while explaining a proposed treatment is more persuasive and informative than any verbal description. Many patients in Vaughan and Woodbridge come to us having seen smile transformations online. A clinical photograph grounds that conversation in their specific anatomy and realistic outcomes.
Photography also supports insurance documentation, peer consultations, and medico-legal records. These are practical benefits that protect both the patient and the practice.
- Before-and-after comparisons evaluate treatment stability at recall appointments
- Standardized images support peer review and continuing education case presentations
- Photographic records reduce disputes by providing an objective baseline
What is cosmetic dental imaging and how does it differ from photography?
Cosmetic dental imaging is a distinct but related discipline. Digital simulation software creates real-time virtual previews of teeth whitening, veneers, and smile makeovers during the consultation appointment. The patient sees a proposed outcome on screen before any clinical work begins.
Imaging uses the clinical photographs as its source material. The dentist or treatment coordinator imports the patient’s images into software, then modifies tooth shape, color, and alignment to reflect the proposed treatment. The result is a visual simulation, not a guarantee, and communicating that distinction clearly is part of responsible informed consent.
The benefits of cosmetic dental imaging include:
- Expectation management: Patients understand what is achievable within their anatomy before committing to treatment
- Anxiety reduction: Seeing a realistic simulation reduces fear of the unknown for patients considering veneers or smile makeovers
- Informed consent: The visual record of the simulation supports a documented discussion of treatment goals
- Treatment motivation: Patients who see a compelling preview are more likely to proceed and to comply with post-treatment care
The distinction from traditional photography is important. Photography captures reality. Imaging projects possibility. Both serve the patient, but they serve different moments in the treatment journey. You can read more about how cosmetic dentistry builds confidence and how imaging supports that process.
Pro Tip: Always label digital simulations clearly as “proposed outcome” in the patient file. This protects you legally and sets the right expectations from the start.
What are the most common pitfalls in dental photography?
Even experienced clinicians make repeatable mistakes in dental photography. The good news is that most of them have straightforward solutions.
Stability and retractor management
Holding retractors while also operating the camera is one of the most common errors. Having the patient or a trained assistant hold the retractors frees both of the photographer’s hands for camera control and produces sharper, better-framed images. This single change improves image quality immediately.
Using the same retractor size for every view is another frequent mistake. Smaller retractors work better for lateral views, while larger ones suit the full frontal retracted shot. Pre-warming mirrors before use prevents fogging from patient breath, which is one of the most common causes of unusable intraoral images.
Focusing technique
Constant refocusing mid-shoot introduces inconsistency. The rock-and-pull technique sets the magnification once on the lens, then moves the entire camera toward or away from the patient until the image sharpens in the viewfinder. This approach locks the magnification ratio and produces reproducible shots across multiple sessions without readjusting the lens.
Other common pitfalls to avoid:
- Changing ISO or aperture between shots in the same session
- Allowing ambient light to compete with the flash
- Failing to check the patient’s lip position before shooting lateral views
- Storing images without a consistent naming or filing system
How should dental professionals integrate photography into daily practice?
Integrating dental photography into a clinical workflow requires a written protocol and consistent scheduling. Without both, photography becomes an afterthought rather than a standard of care.
Here is a practical framework for building photography into your practice:
- Write a standard operating procedure. Define the camera settings, retractor types, mirror sizes, and shot sequence your practice uses. Every team member who assists with photography should follow the same document.
- Schedule photography at defined treatment stages. Capture images at the initial consultation, at any preparation appointment, at the delivery appointment, and at the first recall visit after treatment. This creates a complete clinical timeline.
- Integrate images with patient management software. Store photographs in the patient’s digital record alongside clinical notes and radiographs. Software platforms that link images to specific teeth or treatment codes make retrieval faster during lab communication or insurance submissions.
- Use images in case presentations. Showing a patient their own before-and-after photographs during a recall appointment reinforces the value of the treatment they received. It also opens natural conversations about additional cosmetic dental treatments they may not have considered.
- Share images with the dental laboratory at every stage. Send photographs with every lab prescription, not just at the initial case submission. Mid-treatment images help the technician adjust the restoration before the final delivery appointment.
- Use images for professional education and marketing with written consent. Case photographs submitted to continuing education courses or used in practice marketing require explicit patient consent. Build a consent form into your new patient intake process.
The cosmetic dentistry consultation checklist at Woodbridgedentalcentre outlines how photography fits into a structured consultation workflow from the first appointment onward.
Key takeaways
Cosmetic dental photography is a standardized clinical discipline that requires consistent equipment, fixed protocols, and deliberate integration into every stage of the treatment workflow.
| Point | Details |
|---|---|
| Standardized 12-view protocol | The American Academy of Cosmetic Dentistry recommends 12 specific shots to document every cosmetic case fully. |
| Fixed manual camera settings | ISO 100–200 and aperture f/16–f/22 with ring flash produce reproducible, color-accurate clinical images. |
| Photography reduces lab remakes | Shadow-free, standardized images give technicians accurate references that improve restoration fit on the first try. |
| Imaging differs from photography | Digital simulation software previews proposed outcomes for patients; photography documents clinical reality. |
| Rock-and-pull technique | Locking magnification and moving the camera body ensures consistent focus across multiple sessions. |
Why consistency matters more than creativity in dental photography
In my experience, the biggest misconception dental professionals bring to photography is that it requires a creative eye. It does not. It requires discipline.
I have reviewed case presentations from colleagues where the before photos were taken under operatory lights with a smartphone and the after photos were taken with a DSLR and ring flash. The improvement in the after photo looks dramatic, but you cannot tell how much of that improvement is the treatment and how much is the lighting change. That comparison is clinically useless and potentially misleading to the patient.
The value of dental photography comes entirely from reproducibility. When the angle, the lighting, the magnification, and the retraction are identical across every session, the images tell you something real. They show you whether the gingival margin has stabilized, whether the shade match held at the six-month recall, and whether the occlusion has shifted. That is diagnostic information. A beautifully composed but inconsistent photograph is just a picture.
Many dental students I have spoken with feel intimidated by the equipment. The good news is that a fixed manual protocol removes most of the decision-making. Once your settings are locked and your shot sequence is memorized, photography becomes a clinical routine rather than a technical challenge. The investment in learning it properly pays back in better lab relationships, fewer remakes, and patients who trust what you show them.
— Felix
See how Woodbridgedentalcentre uses photography in cosmetic care
At Woodbridgedentalcentre, Dr. Michael Rouhi and Dr. Sandra Farber use standardized dental photography and digital imaging as part of every cosmetic consultation. Patients in Woodbridge, Vaughan, and Maple receive a thorough photographic assessment before any treatment begins, so the plan is grounded in clear clinical evidence from the start.

Whether you are considering veneers, teeth whitening, or a full smile makeover in Woodbridge, our team uses photography to show you exactly where you are starting from and what your options look like. We also use digital imaging to walk you through proposed outcomes before you commit to any procedure. If you are ready to see what your smile can look like with the right treatment plan, contact Woodbridgedentalcentre to schedule a cosmetic consultation today.
FAQ
What is cosmetic dental photography used for clinically?
Cosmetic dental photography is used to document treatment stages, communicate with dental laboratories, support diagnosis, and educate patients about proposed outcomes. The American Academy of Cosmetic Dentistry recommends a standardized series of 12 images for every cosmetic case.
What camera settings work best for dental photography?
The recommended settings are ISO 100–200, aperture f/16–f/22, and a shutter speed synced to the flash. A 100mm or 105mm macro lens on a DSLR or mirrorless body produces the sharpest, most reproducible clinical images.
How does cosmetic dental imaging differ from dental photography?
Dental photography captures the patient’s current clinical reality. Cosmetic dental imaging uses software to create a virtual preview of proposed treatments like veneers or whitening, helping patients visualize outcomes before any work begins.
What is the rock-and-pull focusing technique?
The rock-and-pull technique sets the lens magnification once and then moves the entire camera toward or away from the patient to achieve focus. This approach locks the magnification ratio and produces consistent images across multiple sessions without refocusing the lens.
Why do dental photographs reduce laboratory remakes?
Shadow-free images taken with ring or dual-point flash give dental technicians accurate color, shade, and contour references. When the laboratory has a precise visual record, restorations are more likely to match the natural dentition on the first delivery, reducing the need for adjustments or remakes.


